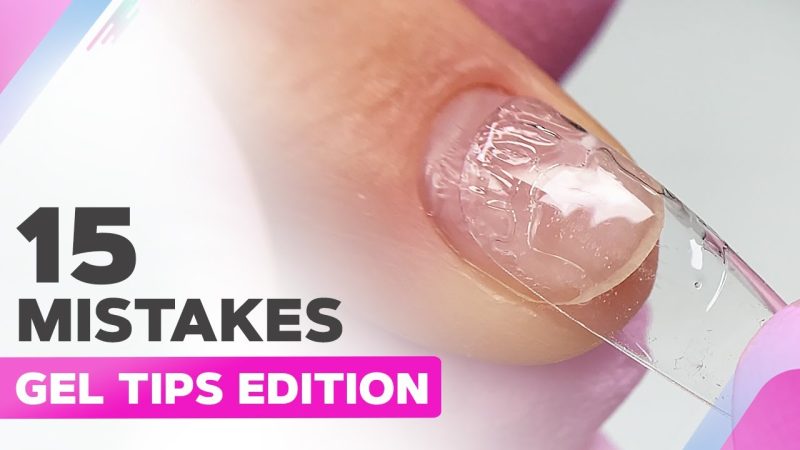
Gel manicures have transformed the nail industry, offering glossy, durable finishes that last weeks without chipping. However, achieving salon-quality results requires more than just applying gel polish. Proper nail preparation, correct application techniques, and consistent aftercare are essential for durability and nail health.
In this complete guide, you’ll discover professional nail tips for gel that ensure long-lasting, flawless results whether you’re a beginner or an experienced nail enthusiast.
Understanding Gel Nail Systems
Before diving into application, it’s important to understand how gel nail systems work. Unlike traditional polish, gel polish cures under a UV or LED lamp. This curing process hardens the gel, creating a durable, chip-resistant finish.
There are different types of gel systems:
- Soft gel polish (soak-off gel)
- Hard gel
- Builder gel
- Gel extensions
Each system requires slightly different techniques, but the foundation remains the same: proper prep, controlled application, and careful curing.
Preparing Natural Nails for Gel Application
Preparation is the most critical step when applying nail tips for gel. Skipping proper prep leads to lifting, peeling, and reduced wear time.
Start by:
- Removing old polish completely
- Gently pushing back cuticles
- Trimming hangnails
- Lightly buffing the nail surface
- Cleaning nails with alcohol or a nail dehydrator
Buffing removes shine, allowing the gel to adhere better. However, avoid over-buffing, as thinning the nail plate can cause weakness and sensitivity.
Proper prep ensures maximum adhesion and long-lasting results.
Choosing the Right Nail Tips for Gel Extensions
If you’re applying gel extensions, selecting the correct nail tips is crucial.
Consider:
- Size (fit sidewall to sidewall)
- Shape (square, coffin, almond, stiletto)
- Material flexibility
- Thickness and strength
Ill-fitting tips cause lifting and discomfort. Always size carefully and gently blend the tip to the natural nail without creating deep ridges.
When applying gel over nail tips, ensure the bonding area is properly sealed and smooth before layering gel.
Applying Gel Polish the Right Way
One of the most overlooked nail tips for gel is controlling product thickness. Thick layers lead to wrinkling and improper curing.
Follow this method:
- Apply a thin base coat and cure.
- Apply thin layers of color, curing between each layer.
- Cap the free edge to prevent chipping.
- Finish with a high-quality top coat and cure.
Thin layers cure evenly and reduce the risk of bubbling or lifting.
The Importance of Proper Curing
Under-curing is a common mistake that affects durability. Every gel brand has specific curing instructions based on lamp wattage.
To ensure proper curing:
- Use the correct lamp type (LED or UV)
- Follow manufacturer timing
- Replace old bulbs regularly
- Avoid applying layers that are too thick
Incomplete curing leads to peeling, dullness, and allergic reactions. Proper curing locks in shine and longevity.
Avoiding Common Gel Nail Mistakes
Even small mistakes can reduce wear time. Here are common issues to avoid:
- Skipping nail dehydration
- Flooding cuticles with gel
- Applying overly thick layers
- Not sealing the edges
- Picking or peeling gel
Peeling gel damages the natural nail plate. Always remove gel safely using soak-off methods or professional filing techniques.
Think of your manicure like a photography project—attention to detail matters. Just like understanding the limitations paper shoot in photography helps improve outcomes, recognizing the limitations of gel systems improves nail results. Overloading product or ignoring prep steps will always limit performance.
Maintaining Gel Nails for Long-Lasting Wear
Maintenance is just as important as application. To extend your gel manicure:
- Apply cuticle oil daily
- Wear gloves when cleaning
- Avoid using nails as tools
- Moisturize hands regularly
Hydrated cuticles reduce lifting. Dry nails shrink slightly, creating gaps between gel and nail plate.
Consistency in aftercare significantly improves longevity.
Safe Removal of Gel Nails
Improper removal is one of the biggest causes of nail damage.
To remove soak-off gel:
- Gently file the top coat to break the seal.
- Soak cotton pads in acetone.
- Wrap nails in foil for 10–15 minutes.
- Gently push off softened gel.
- Buff lightly and hydrate.
Never rip or peel gel off. This removes layers of the natural nail, causing thinning and weakness.
Hard gel requires professional filing rather than soaking.
Strengthening Natural Nails Under Gel
Healthy nails hold gel better. Consider:
- Using strengthening treatments between sets
- Taking occasional gel breaks
- Eating a balanced diet
- Staying hydrated
If nails become thin or sensitive, allow recovery time before reapplying gel.
Just like creative projects can suffer from limitations paper shoot constraints, nails also have physical limitations. Over-processing, excessive filing, and constant enhancements may weaken the natural structure. Balance is key.
Professional Tips for Salon-Quality Results at Home
To achieve professional-level gel manicures:
- Invest in quality products
- Keep tools sanitized
- Practice precision
- Work in thin layers
- Follow brand instructions
Quality products make a significant difference in durability and finish. Cheap gels may not cure evenly or adhere properly.
Patience is essential. Rushing causes uneven layers, bumps, and lifting.
Conclusion
Mastering nail tips for gel requires understanding preparation, technique, curing, and maintenance. When done correctly, gel nails can last up to three weeks with high shine and minimal chipping.
The key factors for long-lasting results include:
- Proper nail prep
- Thin, even application
- Correct curing
- Consistent aftercare
- Safe removal
Recognizing both the strengths and limitations of gel systems helps you avoid damage and achieve professional-quality results. Just as understanding limitations paper shoot challenges improves creative output, knowing what gel can and cannot do ensures better, healthier manicures.
With practice and attention to detail, you can enjoy strong, glossy gel nails that truly last.
FAQs
1. How long should gel nails last?
Gel nails typically last 2 to 3 weeks when applied and maintained properly.
2. Why do my gel nails lift after a few days?
Lifting usually occurs due to improper nail prep, thick application, or product touching the cuticle area.
3. Can I apply gel without a UV or LED lamp?
No. Gel polish requires curing under a UV or LED lamp to harden properly.
4. Is gel polish damaging to natural nails?
Gel itself is not damaging. Improper removal, over-filing, and peeling cause nail damage.
5. How often should I take a break from gel manicures?
It’s beneficial to take a break every few months to allow natural nails to strengthen and recover.
Also read: What Color Eyeshadow for Brown Eyes? 10 Shades That Make Them Pop