Nail art has evolved rapidly, moving from simple solid colors to intricate designs that look like miniature works of art. One product that has revolutionized creative nail designs is blooming gel polish. Loved by professional nail technicians and DIY enthusiasts alike, blooming gel polish makes it easier than ever to create marble, floral, watercolor, and abstract nail art effects.
If you’ve seen nails with beautifully diffused patterns and wondered how they were created, blooming gel polish is likely the secret. This guide explains what blooming gel polish is, how it works, and how you can use it to elevate your nail art skills.
What Is Blooming Gel Polish?
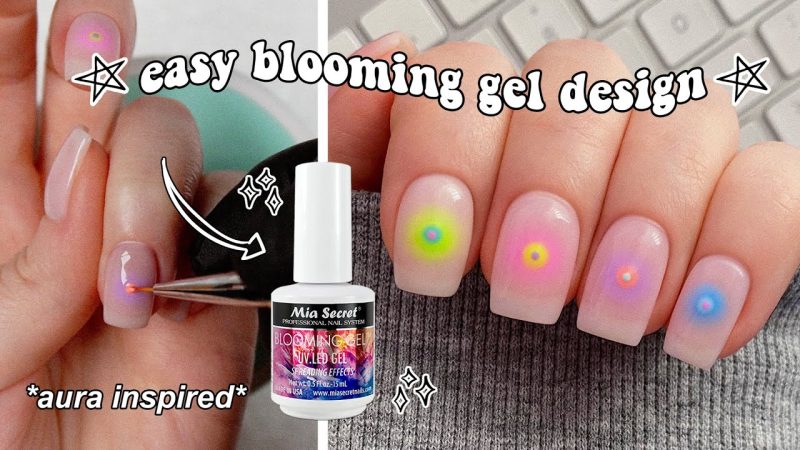
Blooming gel polish is a special type of gel product designed to spread or “bloom” when nail art colors are applied on top of it. Unlike regular gel polish, which stays exactly where it is placed, blooming gel creates a diffusion effect that causes colors to expand outward naturally.
This blooming effect allows nail artists to achieve complex designs without advanced techniques. With minimal effort, you can create soft gradients, floral patterns, and marble effects that would otherwise require significant skill and time.
How Blooming Gel Polish Works
To understand how blooming gel polish works, it helps to look at its formulation. Blooming gel has a thinner, reactive consistency that allows pigments placed on top to spread. When you apply colored gel polish or gel paint over uncured blooming gel, the color begins to disperse automatically.
The longer you wait before curing, the more the design spreads. Once cured under a UV or LED lamp, the design is locked in place. This unique reaction is what makes blooming gel polish such a powerful tool for nail art creativity.
Benefits of Using Blooming Gel Polish
One of the biggest advantages of blooming gel polish is accessibility. Even beginners can create professional-looking nail art without advanced brush control. The blooming effect does much of the work for you.
Another benefit is versatility. Blooming gel polish can be used for countless designs, from soft floral looks to bold abstract patterns. It also saves time, making it ideal for busy nail technicians who want stunning results efficiently.
Types of Nail Art You Can Create with Blooming Gel Polish
Blooming gel polish opens the door to endless design possibilities. Marble nails are one of the most popular styles, created by dropping multiple colors onto blooming gel and allowing them to blend naturally.
Floral designs are another favorite, as petals form effortlessly when dots of color bloom outward. You can also create watercolor effects, animal prints, smoke patterns, and modern abstract art. The flexibility of blooming gel polish makes it a must-have in any nail art collection.
What You Need Before Using Blooming Gel Polish
Before starting with blooming gel polish, it’s important to have the right tools. You’ll need a base coat, your chosen nail color, blooming gel polish, colored gel polishes or gel paints for designs, and a top coat.
A UV or LED lamp is essential for curing. Fine nail art brushes or dotting tools help control where you place the color. Proper preparation ensures that blooming gel polish performs as intended and delivers clean, beautiful designs.
How to Use Blooming Gel Polish Step by Step
To use blooming gel polish, begin with properly prepped nails. Apply base coat and cure, then apply your base color and cure again. Next, apply a thin layer of blooming gel polish but do not cure it.
While the blooming gel is still wet, place small amounts of colored gel polish on top using a brush or dotting tool. Watch as the colors spread and form patterns. Once you’re satisfied with the design, cure the nails under the lamp. Finish with a top coat to seal and protect the artwork.
Tips for Perfect Results with Blooming Gel Polish
Timing is crucial when working with blooming gel polish. Letting the design bloom too long can cause colors to spread excessively, while curing too quickly may limit the effect. Practice helps you find the right balance.
Using small amounts of color gives better control. Also, choose contrasting colors to make designs stand out. Clean brushes between colors to prevent muddy results. These tips help maximize the creative potential of blooming gel polish.
Common Mistakes to Avoid When Using Blooming Gel Polish
One common mistake is applying blooming gel polish too thickly. A thin, even layer works best for controlled blooming. Another mistake is using regular nail polish instead of gel polish for designs, which will not react properly.
Overloading color can also ruin the design. Understanding how blooming gel polish behaves helps you avoid these errors and achieve consistent results.
Blooming Gel Polish vs Regular Gel Polish
While regular gel polish is designed for solid color application, blooming gel polish is specifically formulated for nail art effects. Regular gel stays in place, while blooming gel allows controlled movement of color.
This difference makes blooming gel polish ideal for artistic designs but less suitable as a standalone color. Many nail artists use both products together to achieve layered, professional finishes.
Is Blooming Gel Polish Suitable for Beginners?
Yes, blooming gel polish is one of the most beginner-friendly nail art products available. The blooming effect reduces the need for precise hand movements, allowing beginners to create impressive designs early on.
With practice, users can refine their techniques and experiment with more complex patterns. Whether you’re new to nail art or an experienced professional, blooming gel polish offers creative freedom at every skill level.
Conclusion
Blooming gel polish has transformed the world of nail art by making intricate designs accessible, fast, and fun. Its unique blooming effect allows endless creativity with minimal effort, making it a favorite among nail artists worldwide.
Whether you want elegant floral nails or bold abstract designs, blooming gel polish gives you the tools to express your creativity. With the right techniques and practice, it can elevate your nail art to a professional level.
FAQs
1. What is blooming gel polish used for?
Blooming gel polish is used to create nail art designs such as marble, floral, watercolor, and abstract patterns.
2. Do you cure blooming gel polish before adding design colors?
No, blooming gel polish should remain uncured while you apply design colors so they can bloom properly.
3. Can beginners use blooming gel polish?
Yes, blooming gel polish is beginner-friendly and helps create professional-looking designs with minimal skill.
4. What colors work best with blooming gel polish?
Highly pigmented gel colors work best, especially contrasting shades that show the blooming effect clearly.
5. How do you seal designs made with blooming gel polish?
After curing the design, apply a high-quality top coat and cure again to protect and seal the nail art.
Also read: Blush on Peach: The Perfect Shade for a Natural, Glowing Look